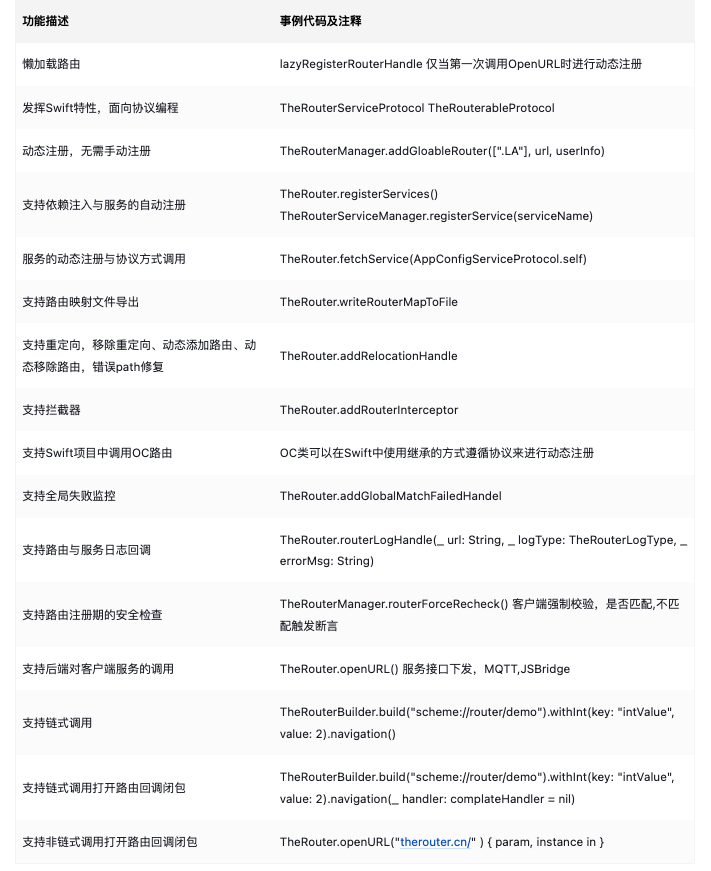
TheRouter一个用于模块间解耦和通信,基于Swift协议进行动态懒加载注册路由与打开路由的工具。同时支持通过Service-Protocol寻找对应的模块,并用 protocol进行依赖注入和模块通信。

随着项目需求的日益增加,开发人员的不断增加,带来了很多问题:
模块划分不清晰,任何开发人员随意调用并修改其他模块的代码实现以满足自己的业务需求。
维护困难,同一组件的不同服务,散落在工程各个地方,不利于统一维护修改替换。
模块负责人无法清晰,导致同一功能多人维护,造成冲突。
另外件拆分完之后都上升到远端,那么它们之间本地的代码是没办法相互依赖的,所以就需要通过一种工具,然后去实现透传服务的能力。我们需要一个中间件去处理这些问题。路由即是将耦合进行转移,通过增加中间层映射关系,解决业务之间的依赖关系。
1. 业务组件化之后,组件化需要将整个项目的各个模块进行解耦,升级远端之后,界面之间的跳转怎么解决?路由 Api
2. 动态注册路由,无需手动注册。服务的动态注册,无需手动注册。
3. 端上跳转统一问题怎么解决?使用统一 URL 映射方式处理
4. 业务跳转中出现问题,如何修改跳转逻辑?服务如何降级? 远端下发配置,修改跳转 URL
5. 业务服务异常,界面改为 h5 界面。重定向
6. App 跳转出现问题如何跳转到同一个本地的 error 界面?统一失败处理
7. 如何在跳转前增加强制的业务逻辑处理,比如业务调整,必须先执行某些操作,才能进入。重定向
8. 业务中有很多需要前置跳转,比如先登录才能去订单列表,如何实现。拦截器
9. 如何测试各个跳转业务是否正常。 路由 Path 校验
10. 如何把最频繁的业务跳转前置,减少查询次数?增加优先级 priority
11. 本地服务通过路由调用,远端服务通过路由调用 支持服务调用
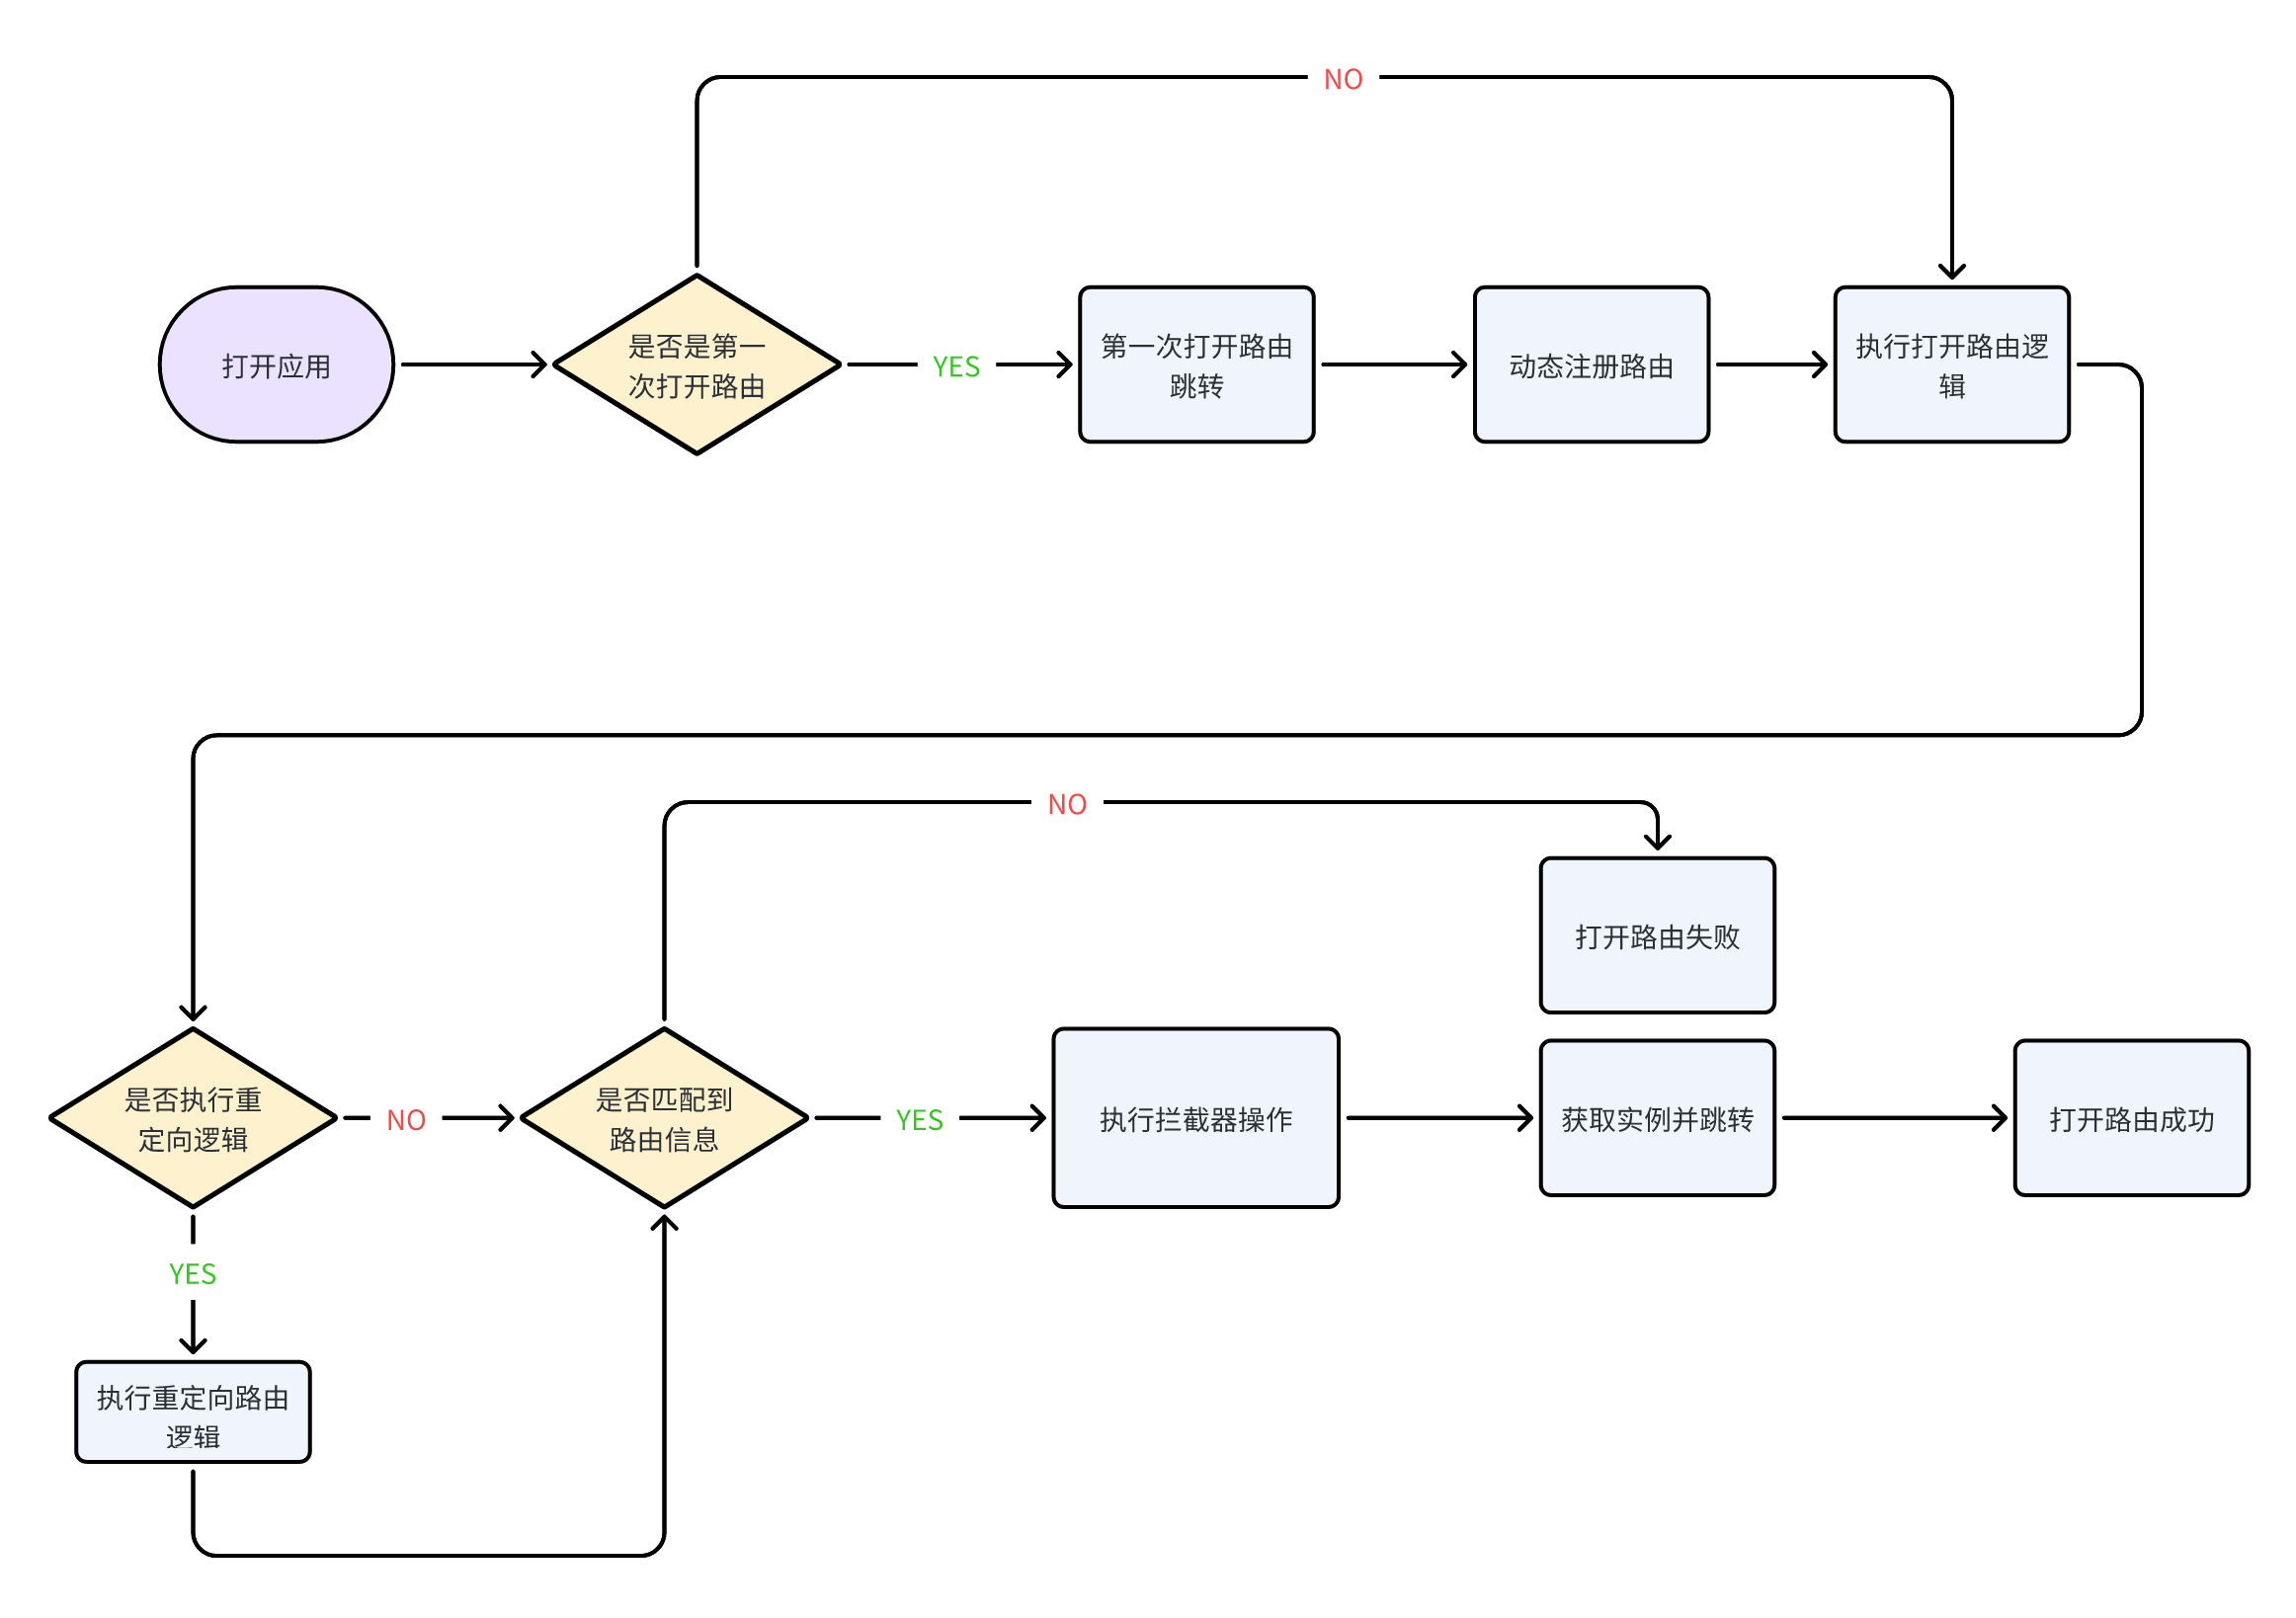
为了和Android端保持一致,使用了URL,class注册的方式实现。通过URL匹配方式查询数组中保存的模版信息,找到执行获取对应实例,执行跳转操作。


Add the following entry in your Podfile:
pod 'TheRouter', '1.1.0'
Swift5.0 or above
鉴于已经实现了自动注册能力,开发者无需自己添加路由,只需要进行如下操作即可
/// 实现TheRouterable协议
extension TheRouterController: TheRouterable {

    static var patternString: [String] {
        ["scheme://router/demo"]
    }

    static func registerAction(info: [String : Any]) -> Any {
        debugPrint(info)

        let vc =  TheRouterController()
        vc.qrResultCallBack = info["clouse"] as? QrScanResultCallBack
        vc.resultLabel.text = info.description
        return vc
    }
}

/// 在AppDelegate中实现懒加载的闭包
// 路由懒加载注册
TheRouter.lazyRegisterRouterHandle { url, userInfo in
    TheRouterManager.injectRouterServiceConfig(webRouterUrl, serivceHost)
    return TheRouterManager.addGloableRouter([".The"], url, userInfo)
}

// 动态注册服务
TheRouterManager.registerServices()

// 日志回调,可以监控线上路由运行情况
TheRouter.logcat { url, logType, errorMsg in
    debugPrint("TheRouter: logMsg- \(url) \(logType.rawValue) \(errorMsg)")
}
这里列举了OC使用注解的方式,Swift因为其缺乏动态性,是不支持注解的。
//使用注解
@page(@"home/main")
- (UIViewController *)homePage{
    // Do stuff...
}
Swift 中,我们都知道 Swift 是不支持注解的,那么 Swift 动态注册路由该怎么解决呢,我们使用 runtime 遍历工程里的方式找到遵循了路由协议的类进行自动注册。
public class func registerRouterMap(_ registerClassPrifxArray: [String], _ urlPath: String, _ userInfo: [String: Any]) -> Any? {

        let expectedClassCount = objc_getClassList(nil, 0)
        let allClasses = UnsafeMutablePointer<AnyClass>.allocate(capacity: Int(expectedClassCount))
        let autoreleasingAllClasses = AutoreleasingUnsafeMutablePointer<AnyClass>(allClasses)
        let actualClassCount: Int32 = objc_getClassList(autoreleasingAllClasses, expectedClassCount)

        var resultXLClass = [AnyClass]()
        for i in 0 ..< actualClassCount {

            let currentClass: AnyClass = allClasses[Int(i)]
            let fullClassName: String = NSStringFromClass(currentClass.self)

            for value in registerClassPrifxArray {
                if (fullClassName.containsSubString(substring: value))  {
                    if currentClass is UIViewController.Type {
                        resultXLClass.append(currentClass)
                    }

    #if DEBUG
                    if let clss = currentClass as? CustomRouterInfo.Type {
                        assert(clss.patternString.hasPrefix("scheme://"), "URL非scheme://开头,请重新确认")
                        apiArray.append(clss.patternString)
                        classMapArray.append(clss.routerClass)
                    }
    #endif
                }
            }
        }

        for i in 0 ..< resultXLClass.count {
            let currentClass: AnyClass = resultXLClass[i]
            if let cls = currentClass as? TheRouterable.Type {
                let fullName: String = NSStringFromClass(currentClass.self)

                for s in 0 ..< cls.patternString.count {

                    if fullName.hasPrefix(NSKVONotifyingPrefix) {
                        let range = fullName.index(fullName.startIndex, offsetBy: NSKVONotifyingPrefix.count)..<fullName.endIndex
                        let subString = fullName[range]
                        pagePathMap[cls.patternString[s]] = "\(subString)"
                        TheRouter.addRouterItem(cls.patternString[s], classString: "\(subString)")
                    } else {
                        pagePathMap[cls.patternString[s]] = fullName
                        TheRouter.addRouterItem(cls.patternString[s], classString: fullName)
                    }
                }
            }
        }

#if DEBUG
        debugPrint(pagePathMap)
        routerForceRecheck()
#endif
        TheRouter.routerLoadStatus(true)
        return TheRouter.openURL(urlPath, userInfo: userInfo)
}
为了避免无效遍历,我们通过传入 registerClassPrifxArray 指定我们遍历包含这些前缀的类即可。一旦是 UIViewController.Type 类型就进行存储,然后再进行校验是否遵循 TheRouterable 协议,遵循则自动注册。无需手动注册。
采用动态注册有一个不好的情况就是在启动时就去动态注册,在 TheRouter 中注册的时机被延后了,放在了 App 第一次通过 TheRouter.openUrl()时进行注册,会判断路由是否加载完毕,未加载完毕进行加载,然后打开路由。
@discardableResult
public class func openURL(_ urlString: String, userInfo: [String: Any] = [String: Any](), handler: complateHandler = nil) -> Any? {
    if urlString.isEmpty {
        return nil
    }
    if !shareInstance.isLoaded {
        return shareInstance.lazyRegisterHandleBlock?(urlString, userInfo)
    } else {
       return openCacheRouter((urlString, userInfo))
    }
}

// MARK: - Public method
@discardableResult
public class func openURL(_ uriTuple: (String, [String: Any]), handler: complateHandler = nil) -> Any? {
    if !shareInstance.isLoaded {
        return shareInstance.lazyRegisterHandleBlock?(uriTuple.0, uriTuple.1)
    } else {
        return openCacheRouter(uriTuple)
    }
}

public class func openCacheRouter(_ uriTuple: (String, [String: Any]), handler: complateHandler = nil) -> Any? {

    if uriTuple.0.isEmpty {
        return nil
    }

    if uriTuple.0.contains(shareInstance.serviceHost) {
        return routerService(uriTuple)
    } else {
        return routerJump(uriTuple)
    }
}
这是一个 OC 类的界面,实现路由的跳转需要继承 OC 类,并实现 TheRouterAble 协议即可
@interface TheRouterBController : UIViewController
@property (nonatomic, strong) UILabel *desLabel;
@end

@interface TheRouterBController ()

@end

@implementation TheRouterBController

- (void)viewDidLoad {
    [super viewDidLoad];
    self.view.backgroundColor = [UIColor yellowColor];
    [self.view addSubview:self.desLabel];
    // Do any additional setup after loading the view.
}
@end

public class TheRouterControllerB: TheRouterBController, TheRouterable {

    public static var patternString: [String] {
        ["scheme://router/demo2",
         "scheme://router/demo2-Android"]
    }

    public static var descriptions: String {
        "TheRouterControllerDemo"
    }

    public static func registerAction(info: [String : Any]) -> Any {
        let vc =  TheRouterBController()
        vc.desLabel.text = info.description
        return vc
    }
}
// 模型模式
TheRouter.addRouterItem(RouteItem(path: "scheme://router/demo?&desc=简单注册,直接调用TheRouter.addRouterItem()注册即可", className: "TheRouter_Example.TheRouterController", desc: "简单注册,直接调用TheRouter", params: ["key1": 1]))
// 字典模式
TheRouter.addRouterItem(["scheme://router/demo?&desc=简单注册,直接调用TheRouter.addRouterItem()注册即可": "TheRouter_Example.TheRouterController"])
// 常量参数模式
TheRouter.addRouterItem("scheme://router/demo?&desc=简单注册", classString: "TheRouter_Example.TheRouterController")
// 协议模式, TheRouterApi实现了 CustomRouterInfo协议
TheRouter.addRouterItem(TheRouterApi.patternString, classString: TheRouterApi.routerClass)
TheRouter.addRouterItem(["scheme://router/demo": "TheRouter_Example.TheRouterController",
                    "scheme://router/demo1": "TheRouter_Example.TheRouterControllerA"])
TheRouter.removeRouter(TheRouterViewCApi.patternString)
声明了不同的方法,主要用于明显的区分,内部统一调用 openURL
便利构造器链式打开路由
let model = TheRouterModel.init(name: "AKyS", age: 18)
TheRouterBuilder.build("scheme://router/demo")
    .withInt(key: "intValue", value: 2)
    .withString(key: "stringValue", value: "2222")
    .withFloat(key: "floatValue", value: 3.1415)
    .withBool(key: "boolValue", value: false)
    .withDouble(key: "doubleValue", value: 2.0)
    .withAny(key: "any", value: model)
    .navigation()

TheRouterBuilder.build("scheme://router/demo")
	.withInt(key: "intValue", value: 2)
	.withString(key: "stringValue", value: "sdsd")
	.withFloat(key: "floatValue", value: 3.1415)
	.withBool(key: "boolValue", value: false)
	.withDouble(key: "doubleValue", value: 2.0)
	.withAny(key: "any", value: model)
	.navigation { params, instance in

	}
打开路由常用方式
public class TheRouterApi: CustomRouterInfo {

    public static var patternString = "scheme://router/demo"
    public static var routerClass = "TheRouter_Example.TheRouterController"
    public var params: [String: Any] { return [:] }
    public var jumpType: LAJumpType = .push

    public init() {}
}

public class TheRouterAApi: CustomRouterInfo {

    public static var patternString = "scheme://router/demo1"
    public static var routerClass = "TheRouter_Example.TheRouterControllerA"
    public var params: [String: Any] { return [:] }
    public var jumpType: LAJumpType = .push

    public init() {}
}

TheRouter.openURL(TheRouterCApi.init().requiredURL)
TheRouter.openWebURL("https://xxxxxxxx")
@discardableResult
public class func openWebURL(_ uriTuple: (String, [String: Any])) -> Any? {
    return TheRouter.openURL(uriTuple)
}

@discardableResult
public class func openWebURL(_ urlString: String,
                             userInfo: [String: Any] = [String: Any]()) -> Any? {
    TheRouter.openURL((urlString, userInfo))
}
元祖形式传入路由与追加参数
TheRouter.openURL(("scheme://router/demo1?id=2&value=3&name=AKyS&desc=直接调用TheRouter.addRouterItem()注册即可,支持单个注册,批量注册,动态注册,懒加载动态注册", ["descs": "追加参数"]))
参数传递方式
let clouse = { (qrResult: String, qrStatus: Bool) in
    print("\(qrResult) \(qrStatus)")
    self.view.makeToast("\(qrResult) \(qrStatus)")
}
let model = TheRouterModel.init(name: "AKyS", age: 18)
TheRouter.openURL(("scheme://router/demo?id=2&value=3&name=AKyS", ["model": model, "clouse": clouse]))
TheRouter.globalOpenFailedHandler { info in
   debugPrint(info)
}
比如在未登录情况下统一拦截:跳转消息列表之前先去登录,登录成功之后跳转到消息列表等。
let login = TheRouterLoginApi.templateString
 TheRouter.addRouterInterceptor([login], priority: 0) { (info) -> Bool in
       if LALoginManger.shared.isLogin {
             return true
       } else {
             TheRouter.openURL(TheRouterLoginApi().build)
             return false
       }
 }
登录成功之后删除拦截器即可。
// MARK: - 客户端强制校验,是否匹配
public static func routerForceRecheck() {
    let patternArray = Set(pagePathMap.keys)
    let apiPathArray = Set(apiArray)
    let diffArray = patternArray.symmetricDifference(apiPathArray)
    debugPrint("URL差集:\(diffArray)")
    debugPrint("pagePathMap:\(pagePathMap)")
    assert(diffArray.count == 0, "URL 拼写错误,请确认差集中的url是否匹配")

    let patternValueArray = Set(pagePathMap.values)
    let classPathArray = Set(classMapArray)
    let diffClassesArray = patternValueArray.symmetricDifference(classPathArray)
    debugPrint("classes差集:\(diffClassesArray)")
    assert(diffClassesArray.count == 0, "classes 拼写错误,请确认差集中的class是否匹配")
}
在进行 classes 本地校验时遇到了类名不匹配问题。
排查原因: 是因为为了避免路由在启动时就注册,影响启动速度,采用了懒加载的方式即第一次打开路由界面的时候才先进行注册然后跳转。但是在我们动态注册之前,某个类因为添加了 KVO (Key-Value Observing 键值监听),这个类在遍历时 className 修改为了 NSKVONotifying_xxx。需要我们进行特殊处理,如下
/// 对于KVO监听,动态创建子类,需要特殊处理
public let NSKVONotifyingPrefix = "NSKVONotifying_"

if fullName.hasPrefix(NSKVONotifyingPrefix) {
    let range = fullName.index(fullName.startIndex, offsetBy: NSKVONotifyingPrefix.count)..<fullName.endIndex
    let subString = fullName[range]
    pagePathMap[cls.patternString[s]] = "\(subString)"
    TheRouter.addRouterItem(cls.patternString[s], classString: "\(subString)")
}
在之上的路由能力下,我们希望 App 能够支持动态增加路由,删除路由,重定向路由、通过路由调起本地服务、远端通过路由调起 App 服务能力,随即进行了动态化的扩展。
定义路由下发模型数据结构
public struct TheRouterInfo {
    public init() {}

    public var targetPath: String = ""
    public var orginPath: String = ""
    // 1: 表示替换或者修复客户端代码path错误 2: 新增路由path 3:删除路由
    public var routerType: TheRouterReloadMapEnum = .none
    public var path: String = "" // 新的路由地址
    public var className: String = "" // 路由地址对应的界面
    public var params: [String: Any] = [:]
}
通过远端下发重定向数据,原本跳转到白色界面的业务逻辑改为跳转到黄色界面
let relocationMap = ["routerType": 1, "targetPath": "scheme://router/demo1", "orginPath": "scheme://router/demo"] as NSDictionary
TheRouterManager.addRelocationHandle(routerMapList: [relocationMap])
TheRouter.openURL("scheme://router/demo?desc=跳转白色界面被重定向到了黄色界面")
在业务中,通常会进行业务调整,那么重定向之后需要恢复的话,就需要移除重定向
let relocationMap = ["routerType": 4, "targetPath": "scheme://router/demo", "orginPath": "scheme://router/demo"] as NSDictionary
TheRouterManager.addRelocationHandle(routerMapList: [relocationMap])
TheRouter.openURL("scheme://router/demo?desc=跳转白色界面被重定向到了黄色界面之后,根据下发数据又恢复到跳转白色界面")
在实际开发中,开发人员因为马虎写错了路由 Path,上线之后无法进行正常的业务跳转,此时就需要通过远端下发路由进行匹配跳转了。scheme://router/demo3 是正确 path,但是本地写错的路由 path 为 scheme://router/demo33,那么需要新增一个 path 进行映射。
let relocationMap = ["routerType": 2, "className": "TheRouter_Example.TheRouterControllerC", "path": "scheme://router/demo33"] as NSDictionary
TheRouterManager.addRelocationHandle(routerMapList: [relocationMap])
let value = TheRouterCApi.init().requiredURL
TheRouter.openURL(value)
在实际开发中,一旦使用 URI 这种方式,牵扯到双端,就可以存在双端不一致的问题,那么如何解决呢,可以通过本地新增多路由 path 解决,也可以通过远端下发新路由解决。
public class TheRouterControllerB: TheRouterBController, TheRouterable {

    public static var patternString: [String] {
        ["scheme://router/demo2",
         "scheme://router/demo2Android"]
    }

    public static func registerAction(info: [String : Any]) -> Any {
        let vc =  TheRouterBController()
        vc.desLabel.text = info.description
        return vc
    }
}
let relocationMap = ["routerType": 2, "className": "TheRouter_Example.TheRouterControllerD", "path": "scheme://router/demo5"] as NSDictionary
TheRouterManager.addRelocationHandle(routerMapList: [relocationMap])
TheRouter.openURL("scheme://router/demo2Android?desc=demo5是Android一个界面的path,为了双端统一,我们动态增加一个path,这样远端下发时demo5也就能跳转了")
@objc
public protocol AppConfigServiceProtocol: TheRouterServiceProtocol {
    // 打开小程序
    func openMiniProgram(info: [String: Any])
}

final class ConfigModuleService: NSObject, AppConfigServiceProtocol {

    static var seriverName: String {
        String(describing: AppConfigServiceProtocol.self)
    }

    func openMiniProgram(info: [String : Any]) {
        if let window = UIApplication.shared.delegate?.window {
            window?.makeToast("打开微信小程序", duration: 1, position: window?.center)
        }
    }
}
/// 使用方式
 if let appConfigService = TheRouter.fetchService(AppConfigServiceProtocol.self){
     appConfigService.openMiniProgram(info: [:])
}
服务使用了runtime动态注册,所以你不用担心服务没有注册的问题。只需像上述案例一样使用即可。
public class func registerServices() {

    let expectedClassCount = objc_getClassList(nil, 0)
    let allClasses = UnsafeMutablePointer<AnyClass>.allocate(capacity: Int(expectedClassCount))
    let autoreleasingAllClasses = AutoreleasingUnsafeMutablePointer<AnyClass>(allClasses)
    let actualClassCount: Int32 = objc_getClassList(autoreleasingAllClasses, expectedClassCount)
    var resultXLClass = [AnyClass]()
    for i in 0 ..< actualClassCount {

        let currentClass: AnyClass = allClasses[Int(i)]
        if (class_getInstanceMethod(currentClass, NSSelectorFromString("methodSignatureForSelector:")) != nil),
           (class_getInstanceMethod(currentClass, NSSelectorFromString("doesNotRecognizeSelector:")) != nil),
           let cls = currentClass as? TheRouterServiceProtocol.Type {
            print(currentClass)
            resultXLClass.append(cls)

            TheRouterServiceManager.default.registerService(named: cls.seriverName, lazyCreator: (cls as! NSObject.Type).init())
        }
    }
}
let dict = ["ivar1": ["key":"value"]]
let url = "scheme://services?protocol=AppConfigLAServiceProtocol&method=openMiniProgramWithInfo:&resultType=0"
TheRouter.openURL((url, dict))
从目前的实现方式来看,懒加载加上动态注册,已经解决了注册时的性能问题。即使需要遍历全工程的类,然后处理相关逻辑,也不会超过0.2s。之所以能够通过Class取得path,因为给类声明了静态变量。
/// 实现TheRouterable协议
extension TheRouterController: TheRouterable {

    static var patternString: [String] {
        ["scheme://router/demo"]
    }

    static func registerAction(info: [String : Any]) -> Any {
        debugPrint(info)

        let vc =  TheRouterController()
        vc.qrResultCallBack = info["clouse"] as? QrScanResultCallBack
        vc.resultLabel.text = info.description
        return vc
    }
}
TheRouter 采用Apache2.0协议,详情参考LICENSE
